BOOK 10/25Menu & stock
Menu management
Manage every menu item at the shop — name/price/photo/recipe (BOM), the group→category→item structure, KDS stations + modifiers, and food-cost analysis — all on the "Menu" page, split into 4 tabs: ✏️ Edit menu, 🗂️ Structure, 🏭 Stations + modifiers, 🧮 BOM cost. Requires menu.edit to open this page at all (the 🧮 BOM cost tab additionally requires cost.view).
✏️ Edit menu — add / edit item details
Quick-add a menu item
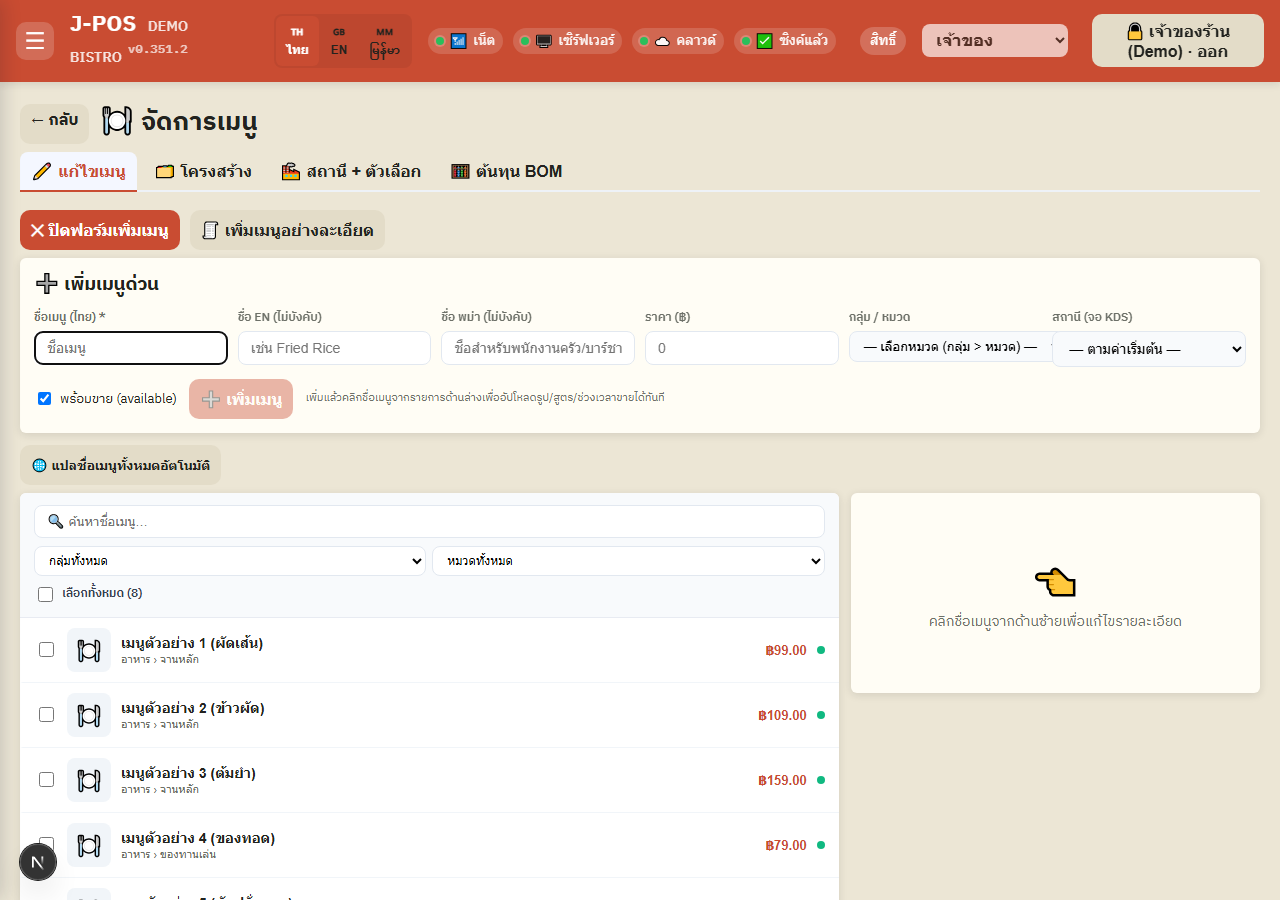
Press "➕ Quick add" to open the form. Only the Thai name is required (price / EN name / Burmese name / group-category / station are optional — leaving the category blank auto-assigns the first existing category).
Press "➕ Add menu" — once added, click the item's name in the list below to immediately add a photo/recipe/sell-time window.
Open full size Add a menu item in full detail (all fields, one dialog)
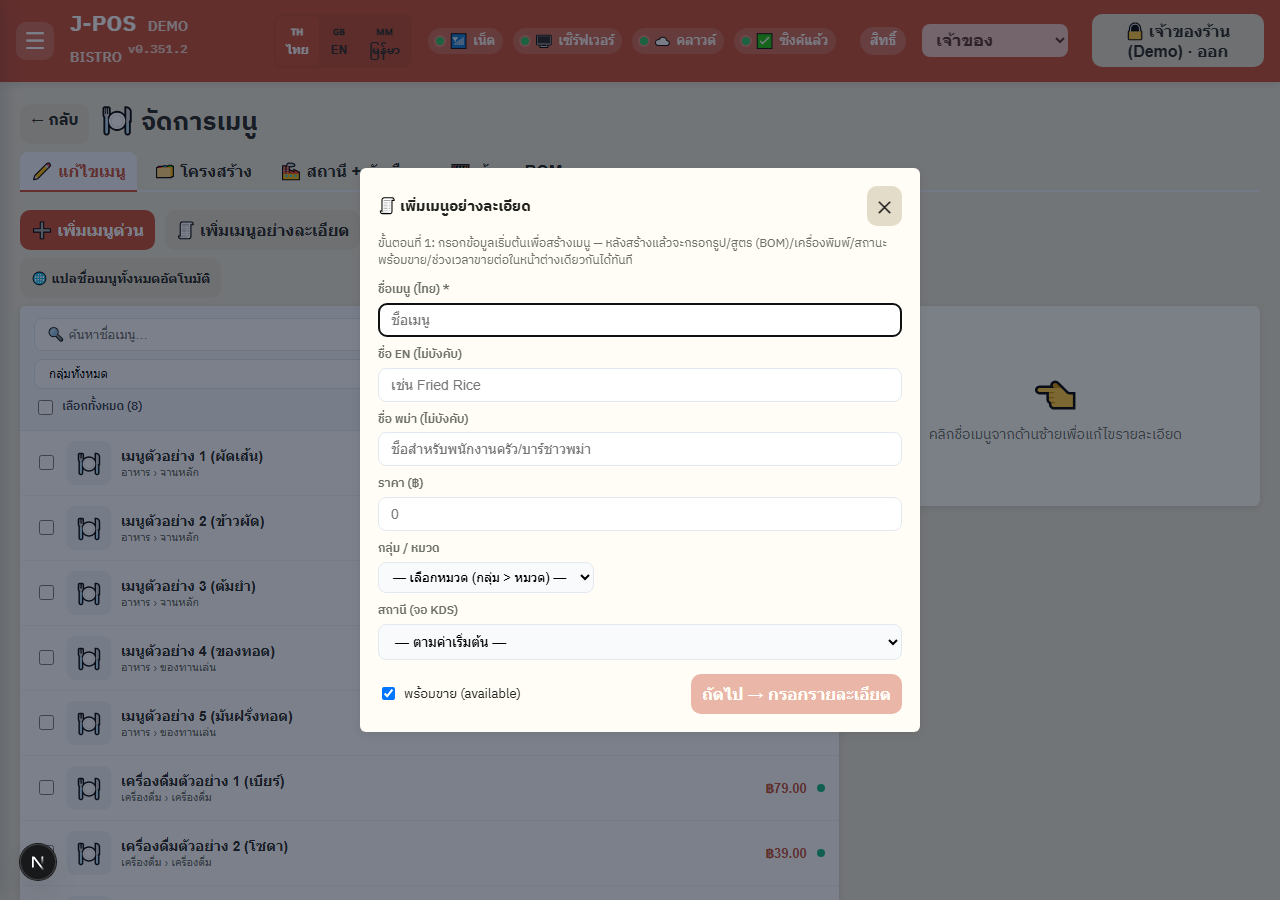
Press "🧾 Detailed add" — Step 1 collects the basic create fields (Thai/EN/Burmese name, price, group/category, station), then press "Next → fill in details".
Step 2: the item is created for real and the full editor (photo/BOM recipe/printer/available/sell-time window) opens in the same dialog immediately — no need to close and reopen.
Open full size Search + filter the menu list
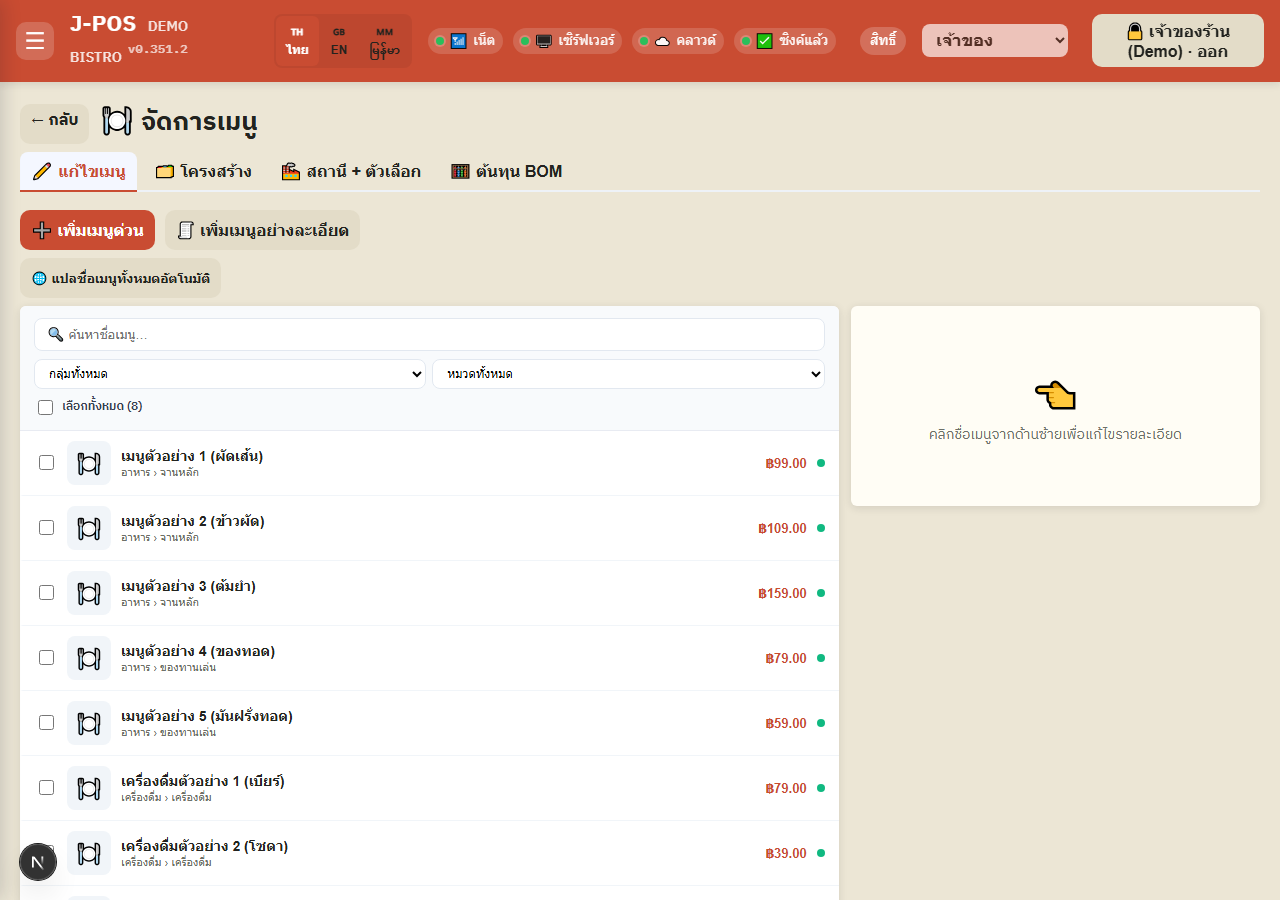
Use the "🔍 Search menu name" box and the "All groups / All categories" filters on the left — picking a group first narrows the category filter to only that group's categories.
Check "Select all" to select every currently filtered item at once, for use with the bulk-edit bar below.
Open full size Edit an item's details (click from the list)
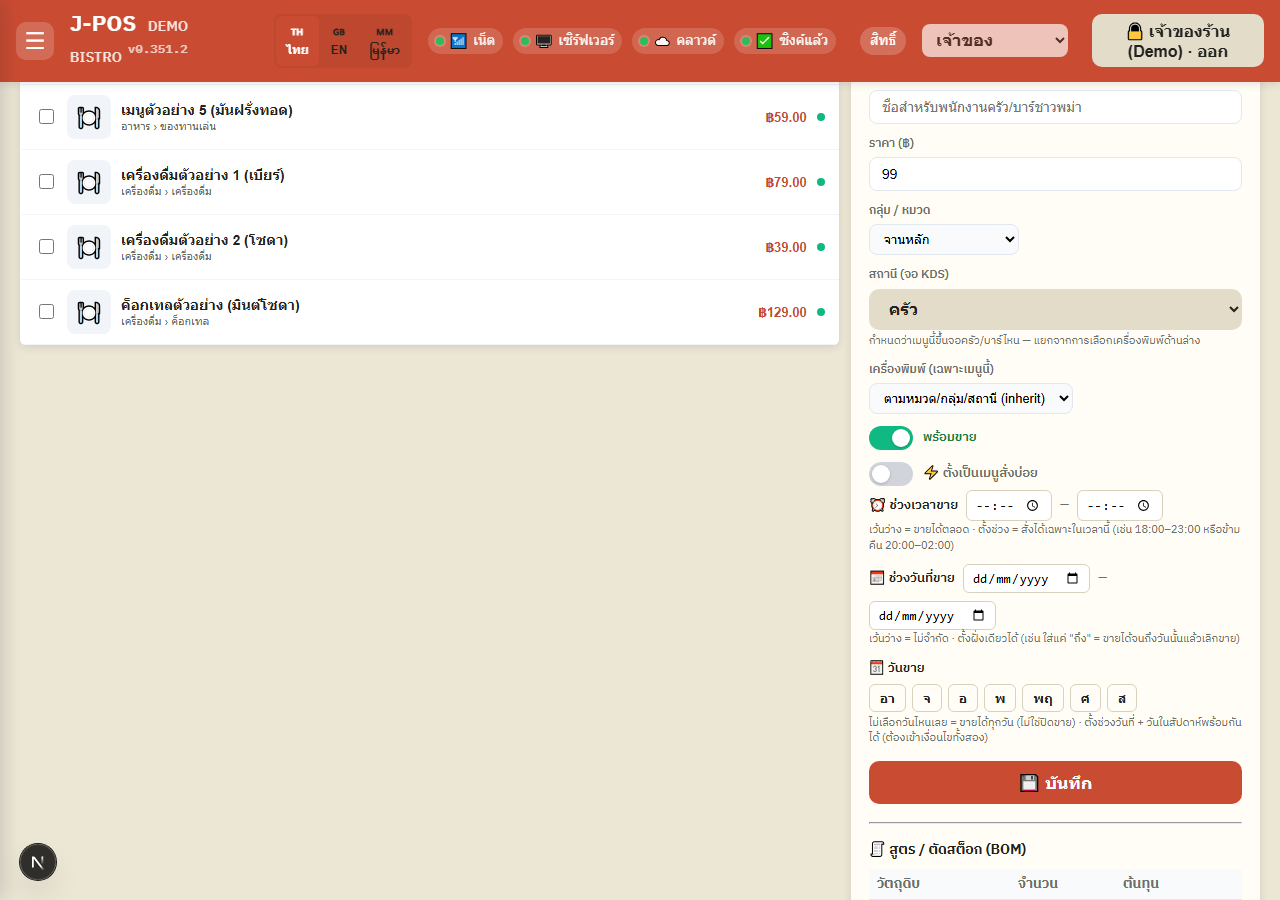
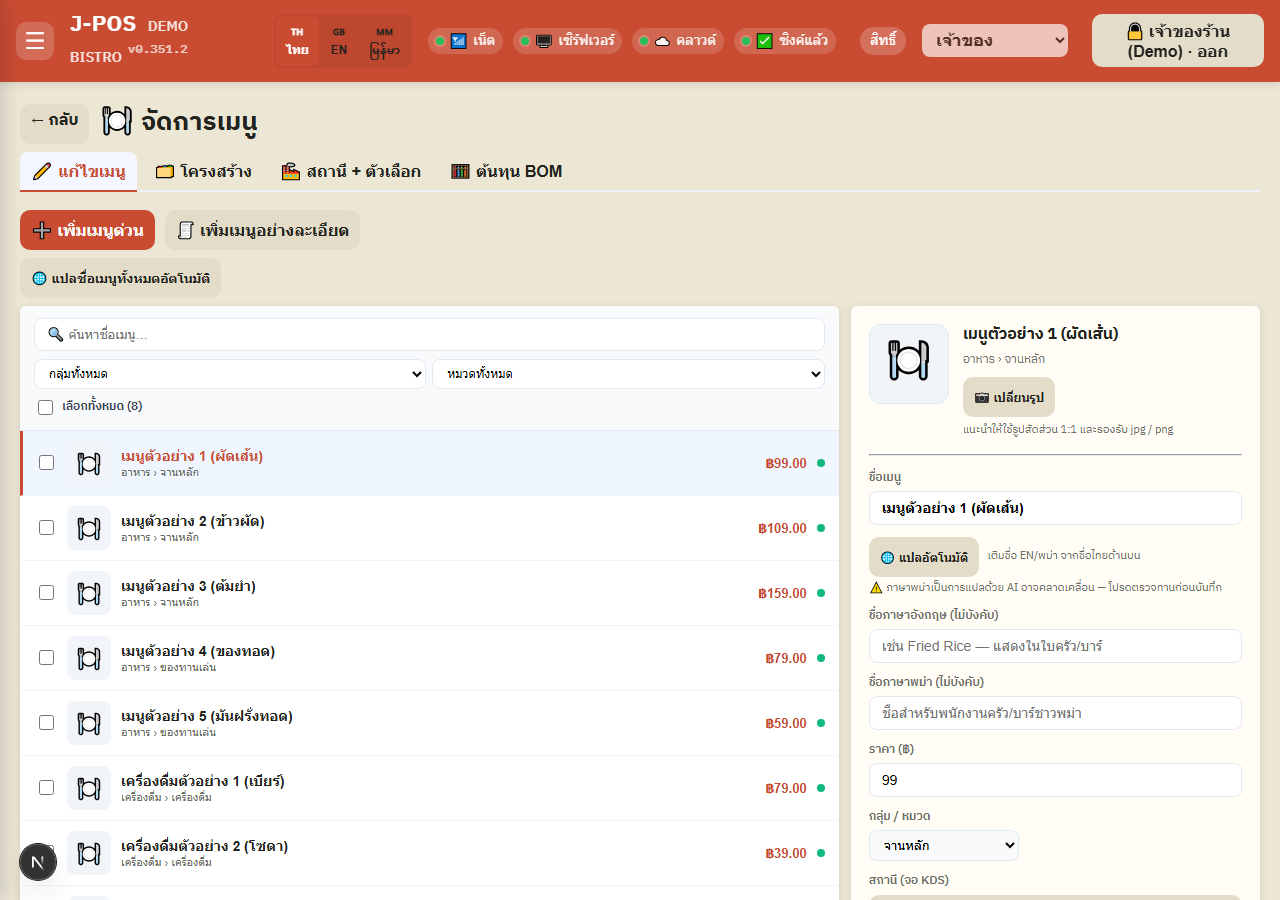
Click an item's name in the left list to open its editor (an inline card on wide screens, a popup modal on mobile/tablet) — edit the Thai name, price, group/category, station (KDS screen), and a printer override just for this item (blank = inherit from category/group/zone).
Press "🌐 Auto-translate" to fill EN/Burmese from the Thai name via Gemini AI — the page explicitly warns the Burmese translation may be inaccurate and must always be reviewed before saving.
The "available/unavailable" switch and "⚡ frequently ordered" toggle (shows as a shortcut button in the table popup) are both right here on this panel.
Press "💾 Save" to save every basic field.
Open full size Set the sell-time window / sell-date range / sell-days
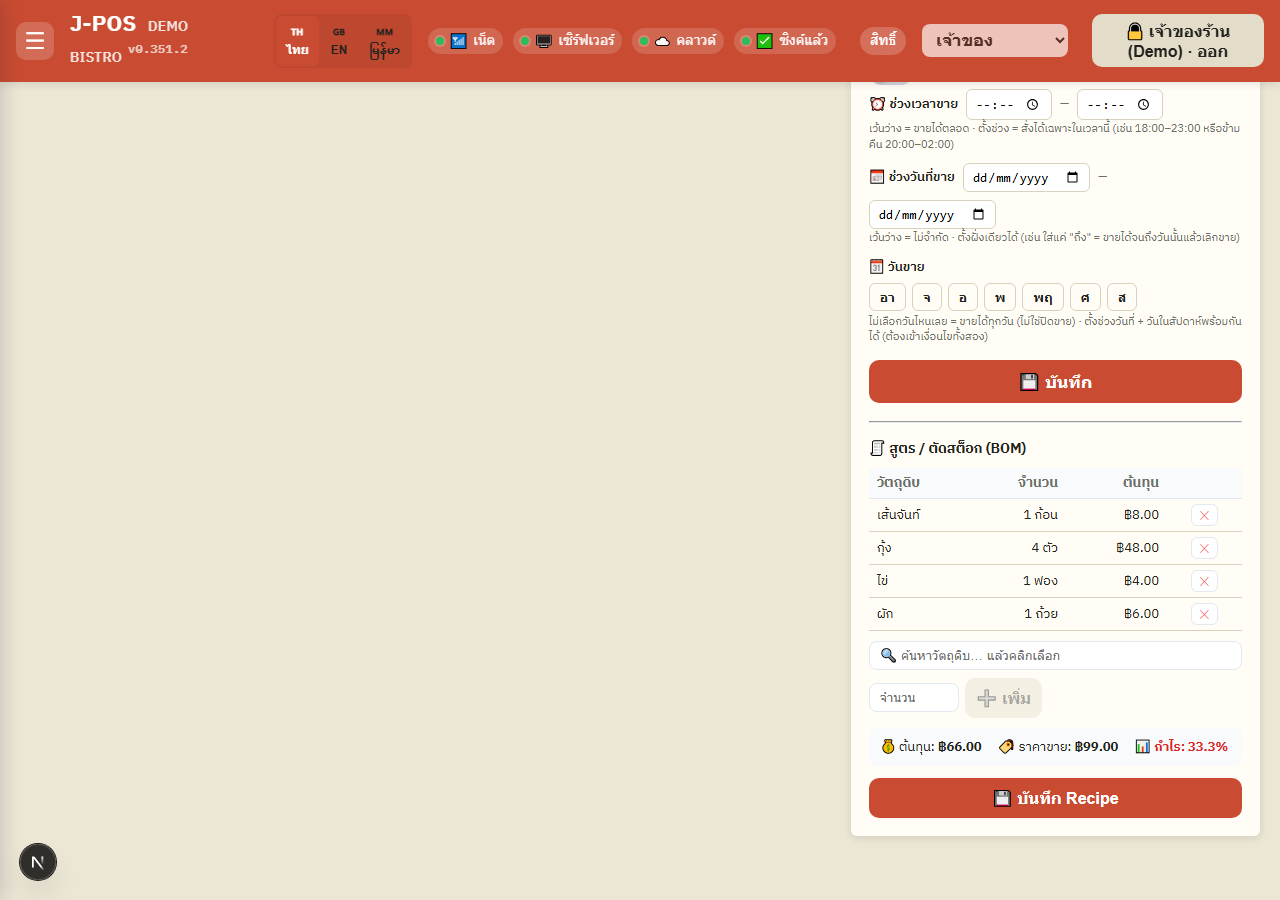
⏰ Sell-time window: enter a start-end time (both blank = sellable all the time) — can cross midnight, e.g. 20:00–02:00.
📅 Sell-date range: restrict which calendar dates the item can be ordered (blank = unlimited; one side alone is fine, e.g. only a "to" date to stop selling after that day).
🗓️ Sell days: tap the weekdays it's orderable on — selecting none means "orderable every day", not disabled. If a sell-date range AND sell-days are both set, the item is only orderable when BOTH conditions hold (AND).
Open full size Upload a menu photo
In the editor, press "📷 Change photo" and pick a jpg/png file — a 1:1 aspect ratio is recommended so it displays well everywhere.
Open full size Bulk-edit multiple items at once
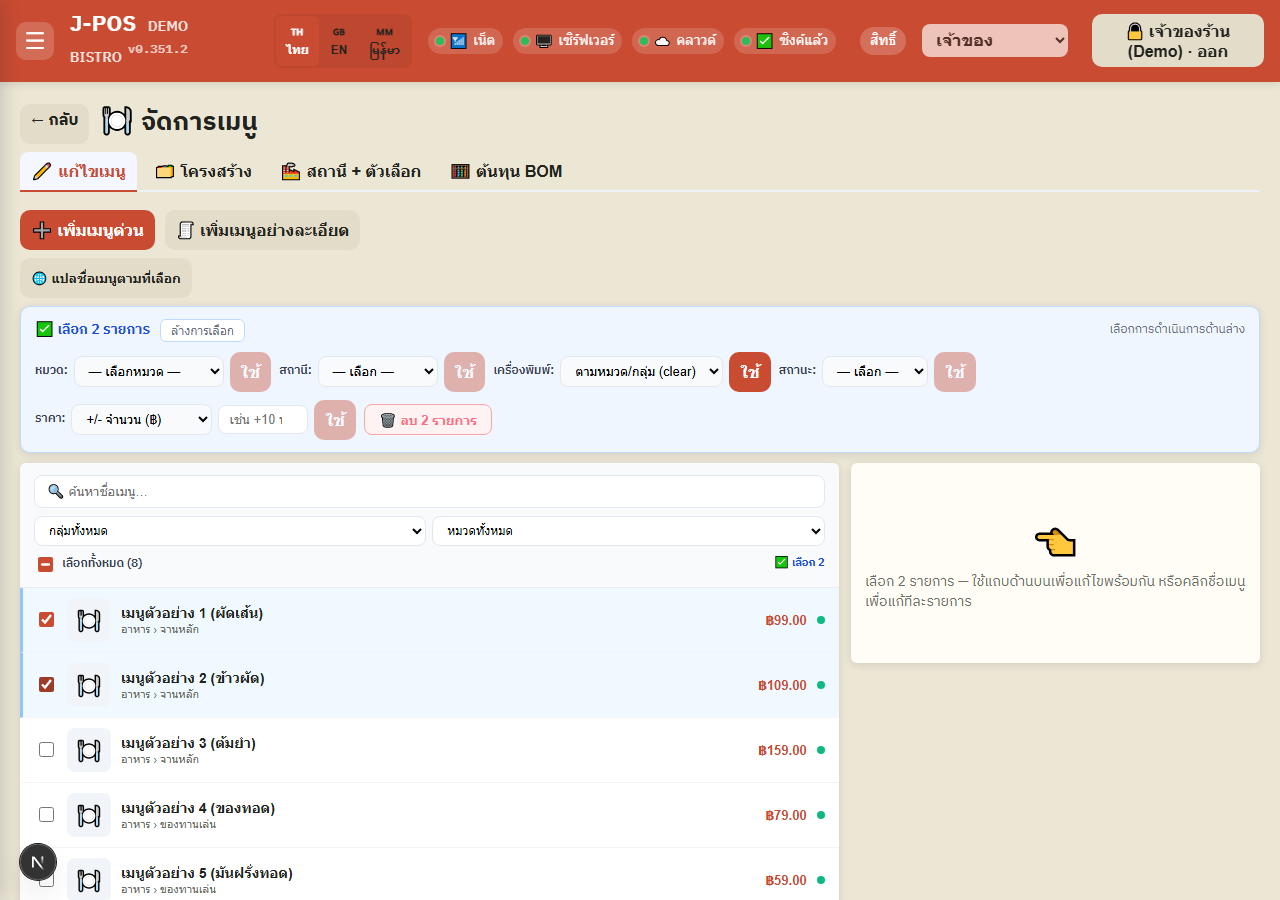
Check items in the list (or use "Select all") — a blue bar appears above with: change category, change station, change printer, turn selling on/off, adjust price (+/- a flat amount or +/- a percentage), and delete all selected.
Each control has its own "Apply" button — apply one action, or several in sequence, to the same selected set.
Open full size Bulk auto-translate item names
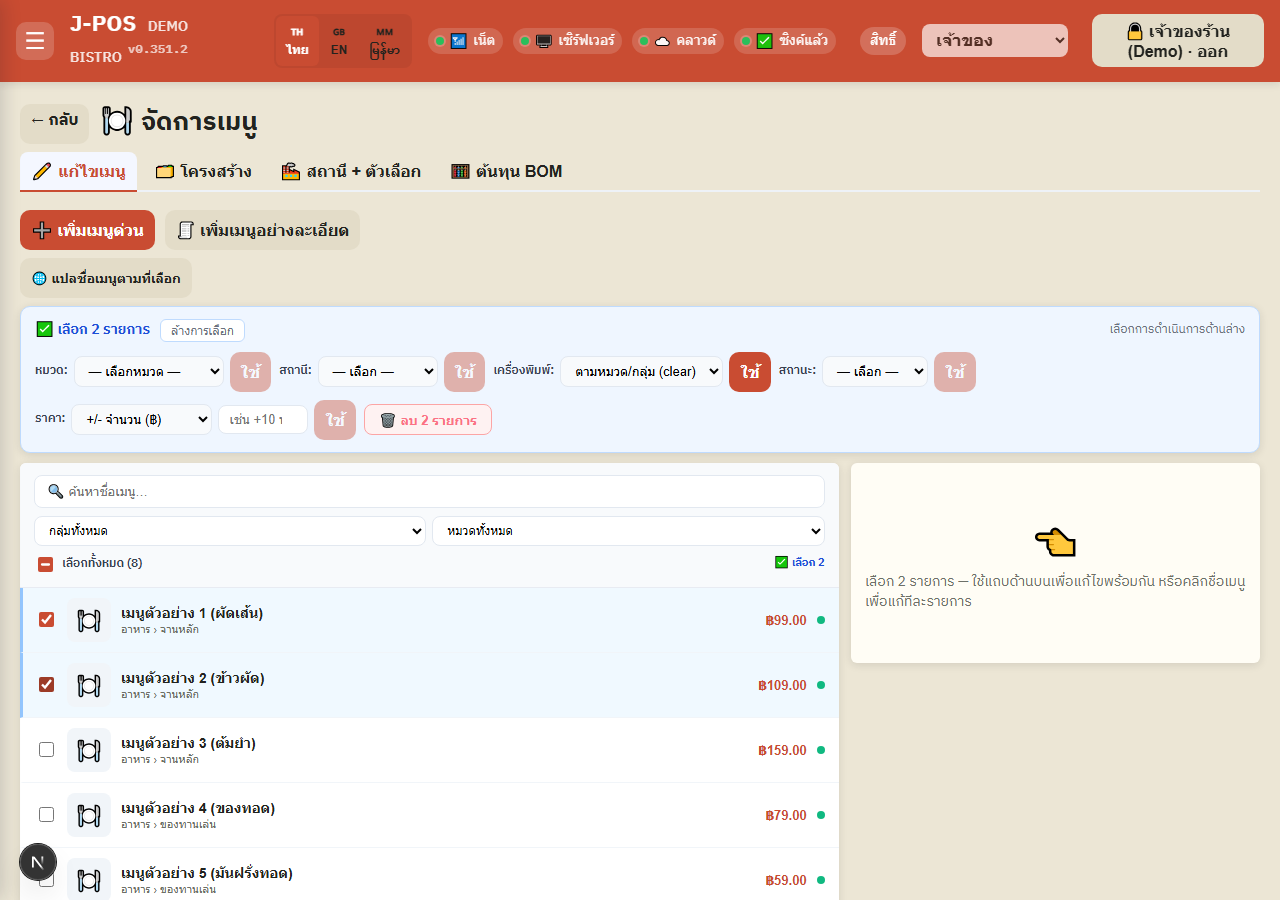
The "🌐 Translate menu names…" button above the list: with nothing selected it translates every item shop-wide that's still missing an EN/Burmese name; with items selected it switches to "Translate selected names" and only touches the checked rows.
Requires GEMINI_API_KEY to already be configured — if it isn't, the page tells you instead of silently failing to translate.
Open full size
🧾 Recipe / ingredient cost (BOM) per item
Add an ingredient to the recipe
In the item editor, scroll to "🧾 Recipe / stock deduction (BOM)", type into the ingredient search box and click a result from the dropdown.
Enter the quantity used per serving — if the ingredient has a separate "deduct unit" from its held unit (e.g. a bottle deducted in ml), a unit picker appears to switch between them.
Press "➕ Add" — picking an ingredient already on the recipe replaces that existing row with the newly entered values instead of creating a duplicate.
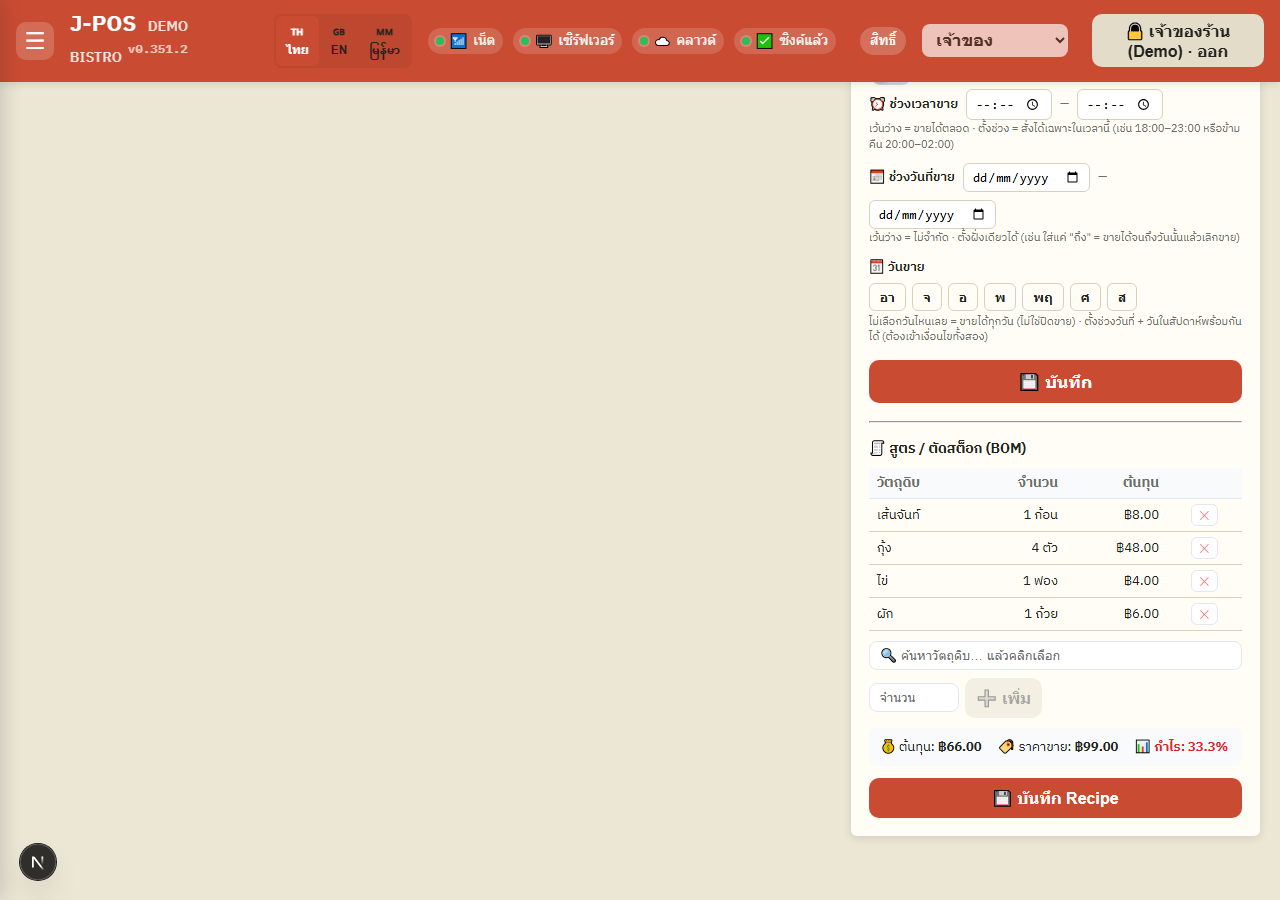
Open full size Remove an ingredient + save the recipe
Press ✕ at the end of a row to remove that ingredient from the recipe.
Press "💾 Save Recipe" to persist the whole recipe — food cost, selling price, and gross margin % are computed and shown right here in the item editor. The cost figures and margin % are shown only to staff with cost.view (without it they read •••) — see "Per-item cost needs cost.view" below.
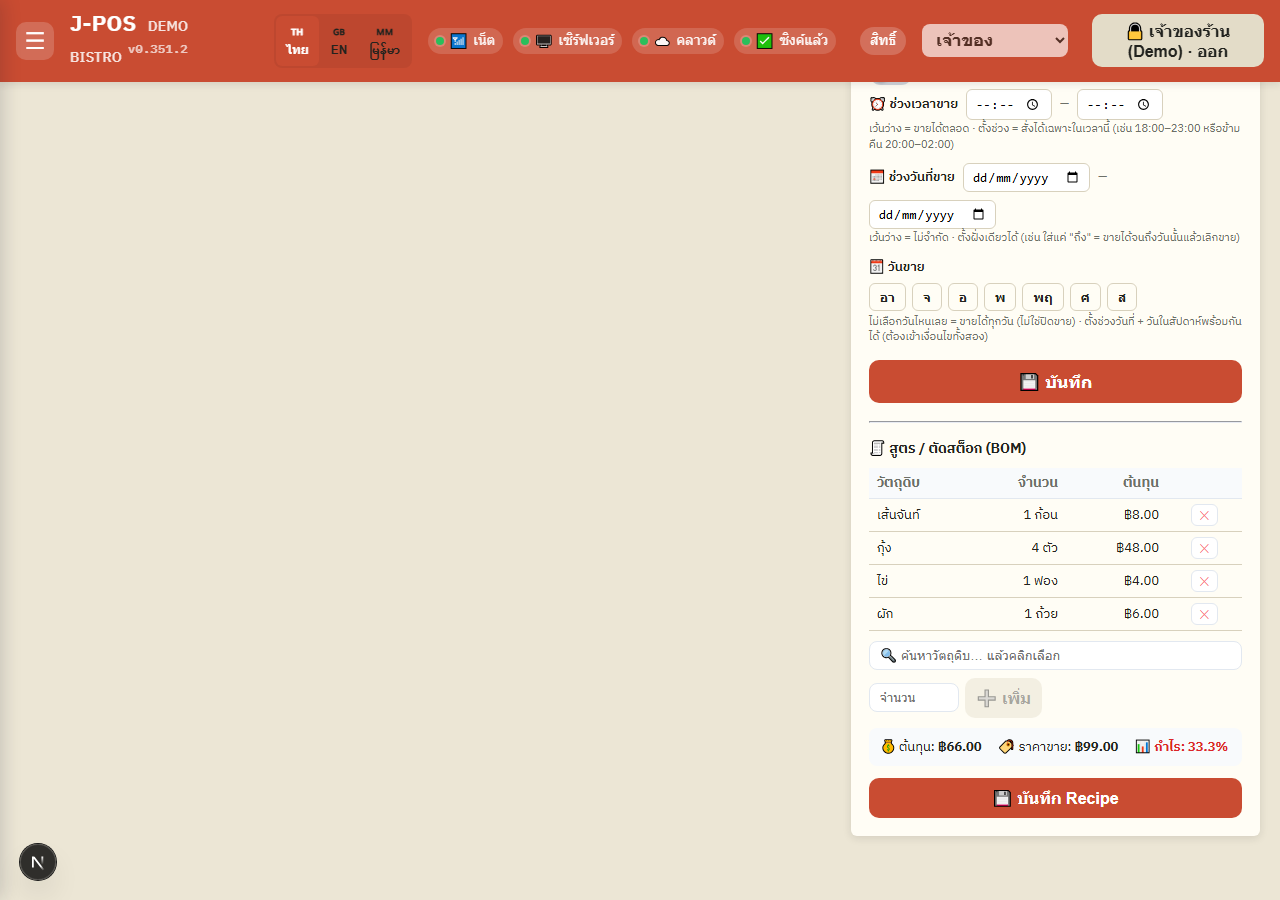
Open full size
🗂️ Structure — Group → Category → Item
Add groups and categories
Use the "➕ Add group" card at the bottom of the tab: enter a group name (e.g. Food, Drinks) and press ➕.
Use the "➕ Add category" card: enter a category name, pick which group it belongs to (or leave blank = ungrouped), then press ➕.
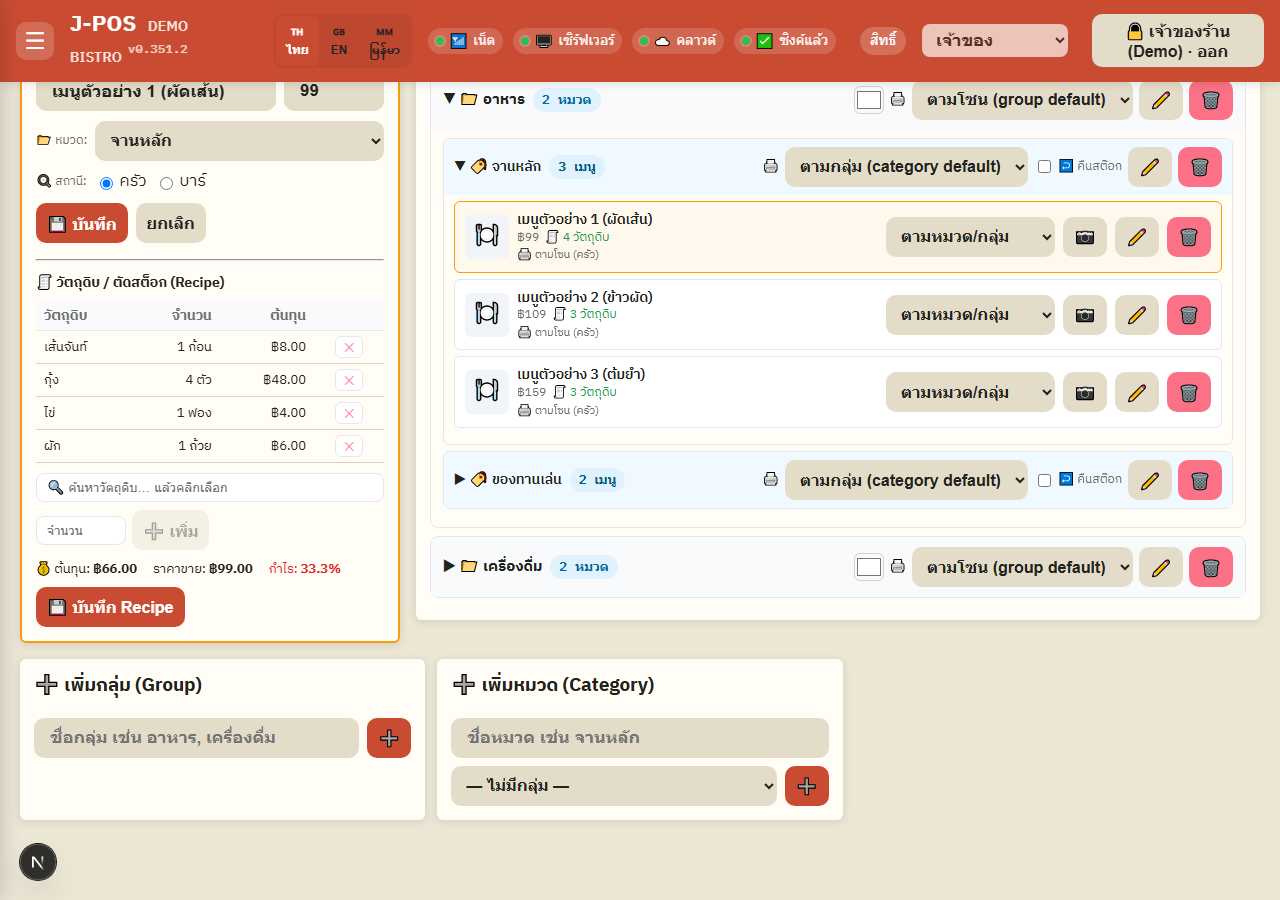
Open full size Set a group's highlight color + printer routing per group/category/item
Tap the color swatch next to a group's name to set a highlight color (used to tint hotcue buttons and distinguish items on the kitchen/bar screen); press ⨯ to clear it.
Assign a printer independently at the group, category, or item level — the inheritance order is: item > category > group > zone default. Set it higher up and any item below that hasn't set its own printer inherits it automatically.
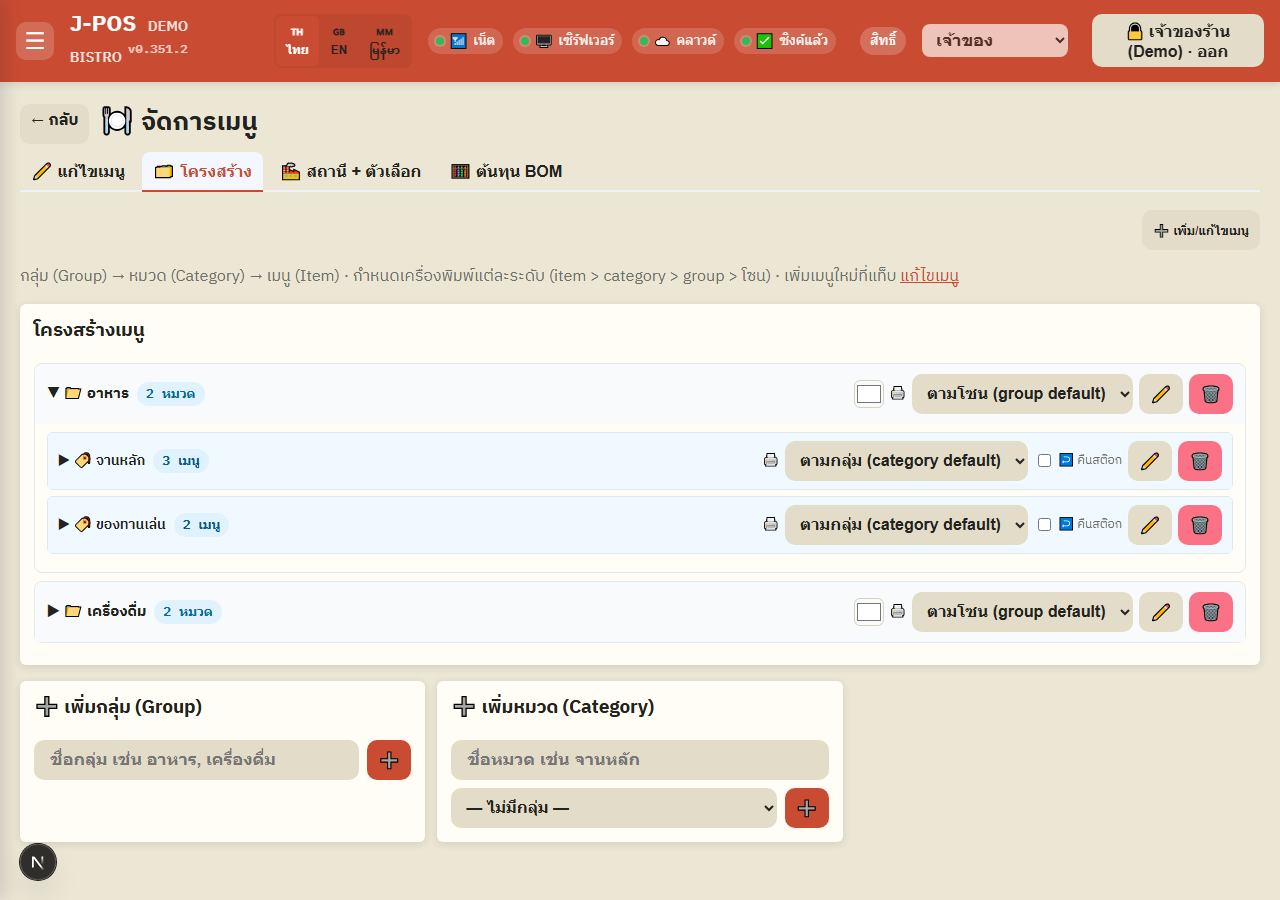
Open full size Turn on "restock on refund" per category
Check "↩️ Restock" on a category header for categories whose ingredients should return to stock when a customer's bill is refunded (e.g. sealed bottles or unopened retail items) — off by default, because prepared/eaten food genuinely can't be returned to stock.
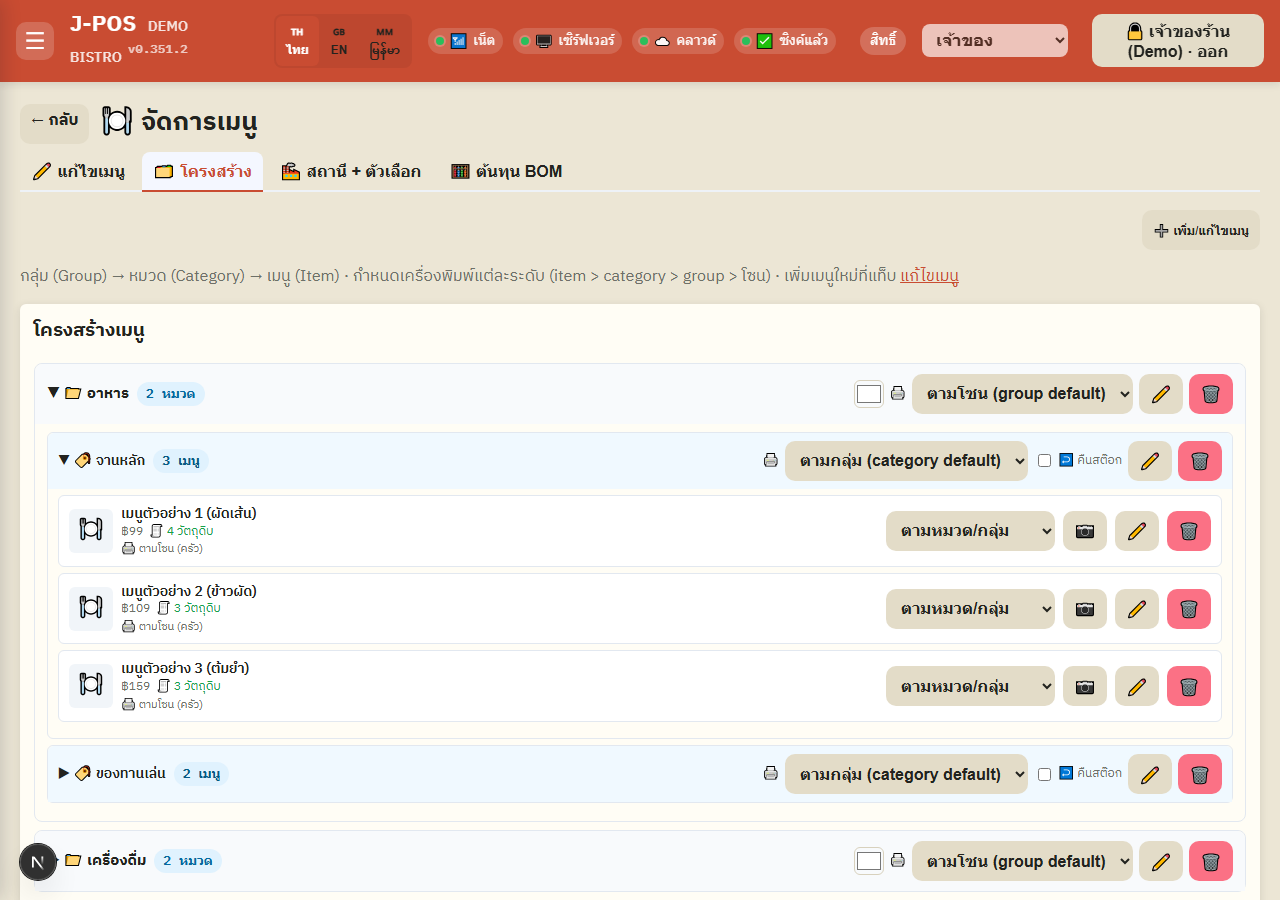
Open full size Edit an item from the structure view
Press ▶ on a group/category to expand its list; press ✏️ on an item row to open an edit panel (name, price, move category, kitchen/bar station) with a matching recipe/cost editor in the same panel — other fields like photo, sell-time window, or EN/Burmese names are edited on the "✏️ Edit menu" tab instead.
Groups/categories/items can all be deleted with 🗑️ on their own row — with an important restriction, see "Deleting a group/category/item — not the same rule" under the edge cases below.
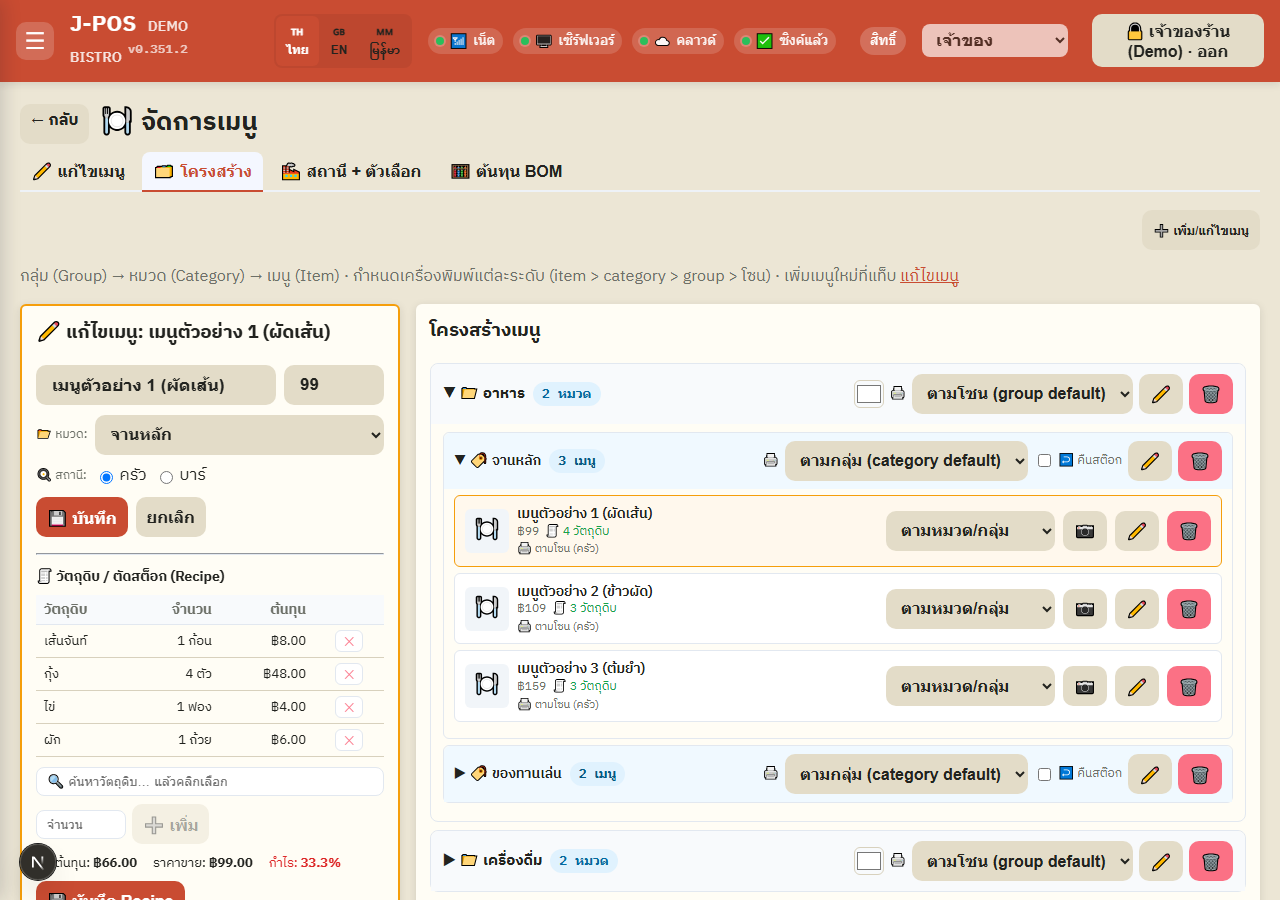
Open full size
🏭 Stations + Modifiers
Manage work stations
Add a new station (e.g. Salad, Coffee) in the form at the top of the "Stations" card — a station is the kitchen/bar screen an item's order lands on, NOT a printer assignment (printers are set on the separate "Printer settings" page).
Rename a station with ✏️ or delete with 🗑 — the delete button is disabled while any item still uses that station, and the count of items using it is shown before you decide.
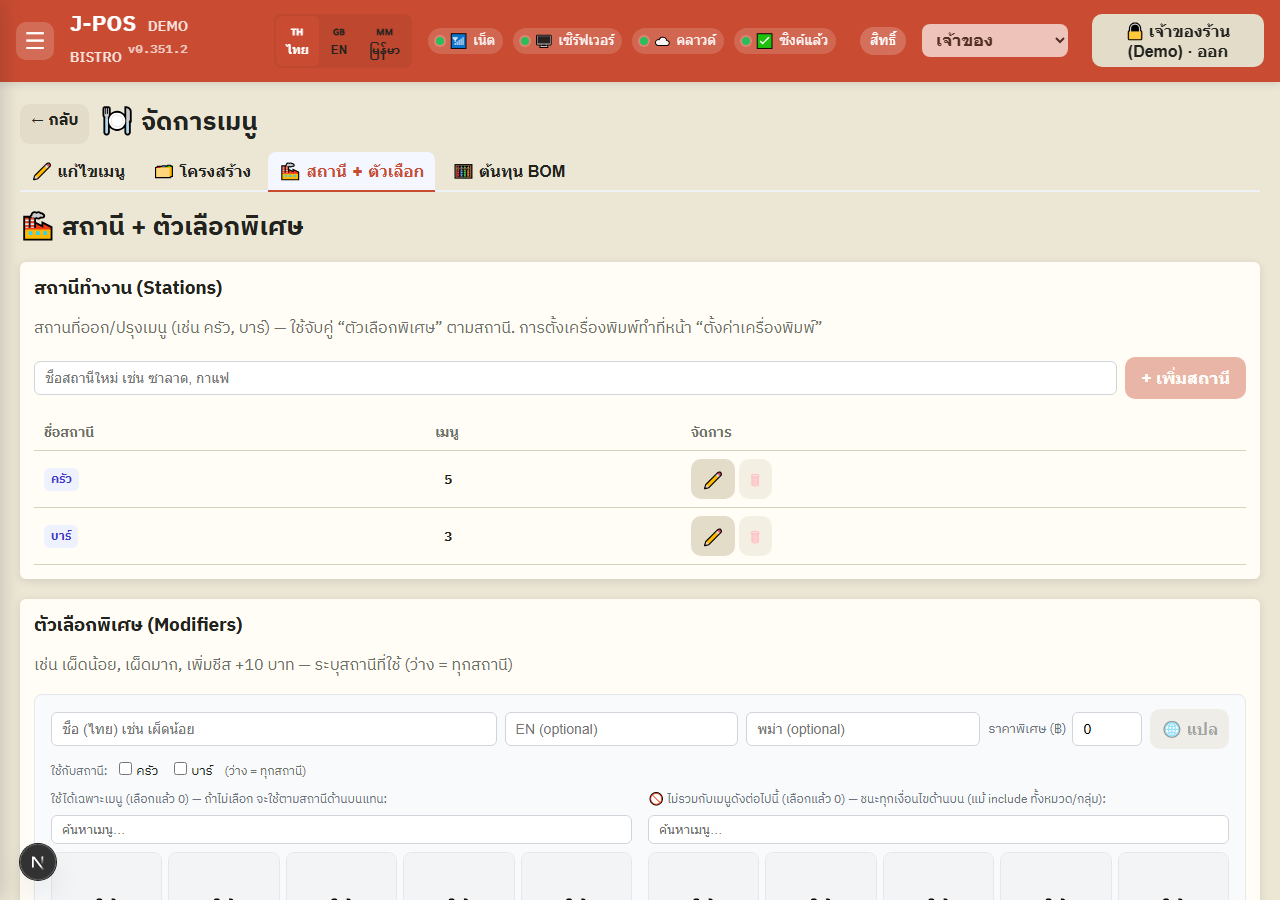
Open full size Add a basic modifier
Enter the (Thai) name, e.g. Mild spicy, Extra spicy, Add cheese, and a surcharge (฿) if any — press 🌐 to auto-translate EN/Burmese from the Thai name.
Check which stations this modifier applies to (blank = every station), then press "+ Add modifier".
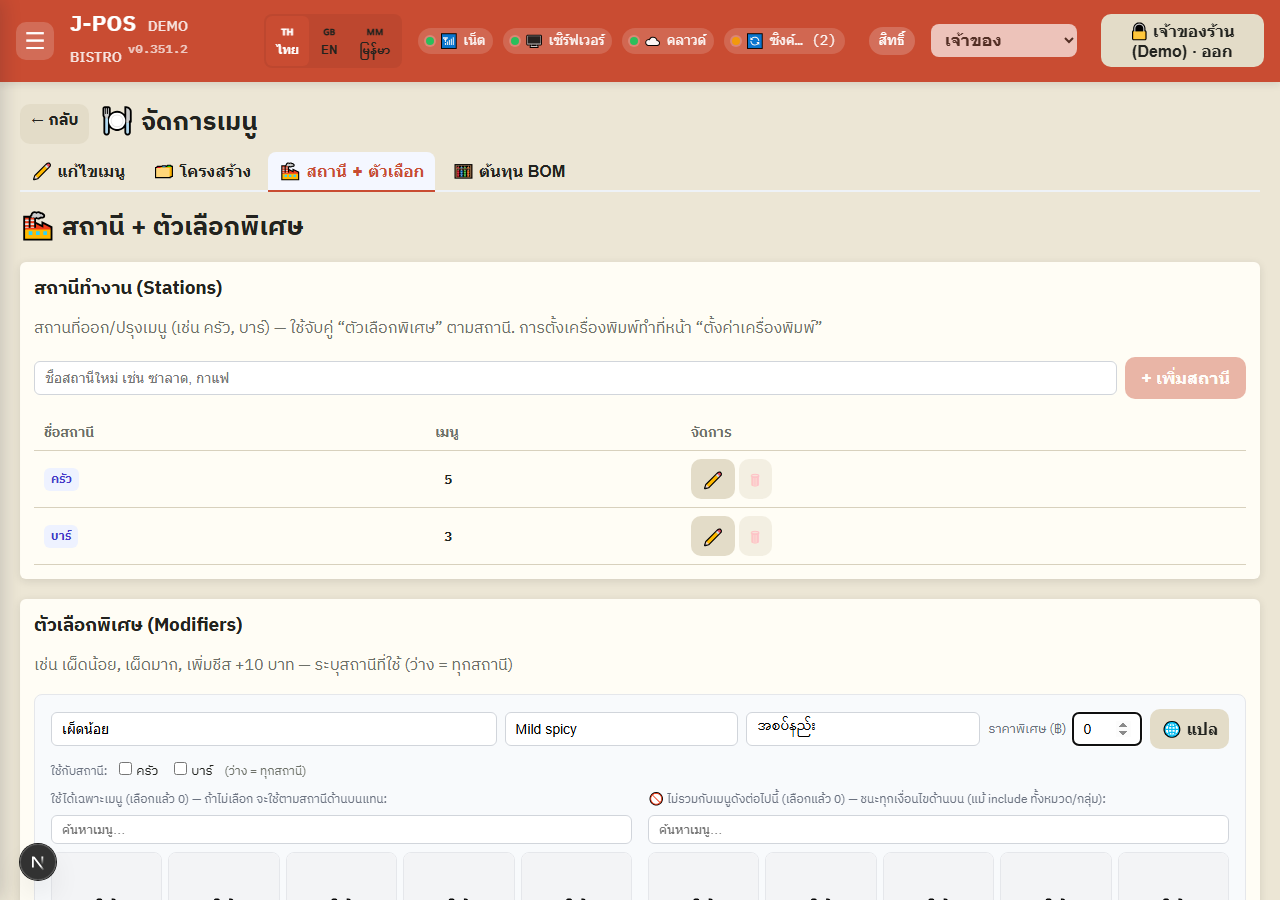
Open full size Scope a modifier to specific items/categories/groups (and exclude some)
If this modifier shouldn't apply to every item at the selected station, pick one of "Only for these items", "For every item in this category", or "For every item in this group" (or mix them — it's a union, not a requirement to match all of them).
Use "🚫 Not combinable with these items" to carve exceptions out of whatever scope you set above (e.g. include a whole category but leave out a couple of items) — the item picker automatically narrows to the stations/categories/groups already chosen, so you don't have to search the whole catalog.
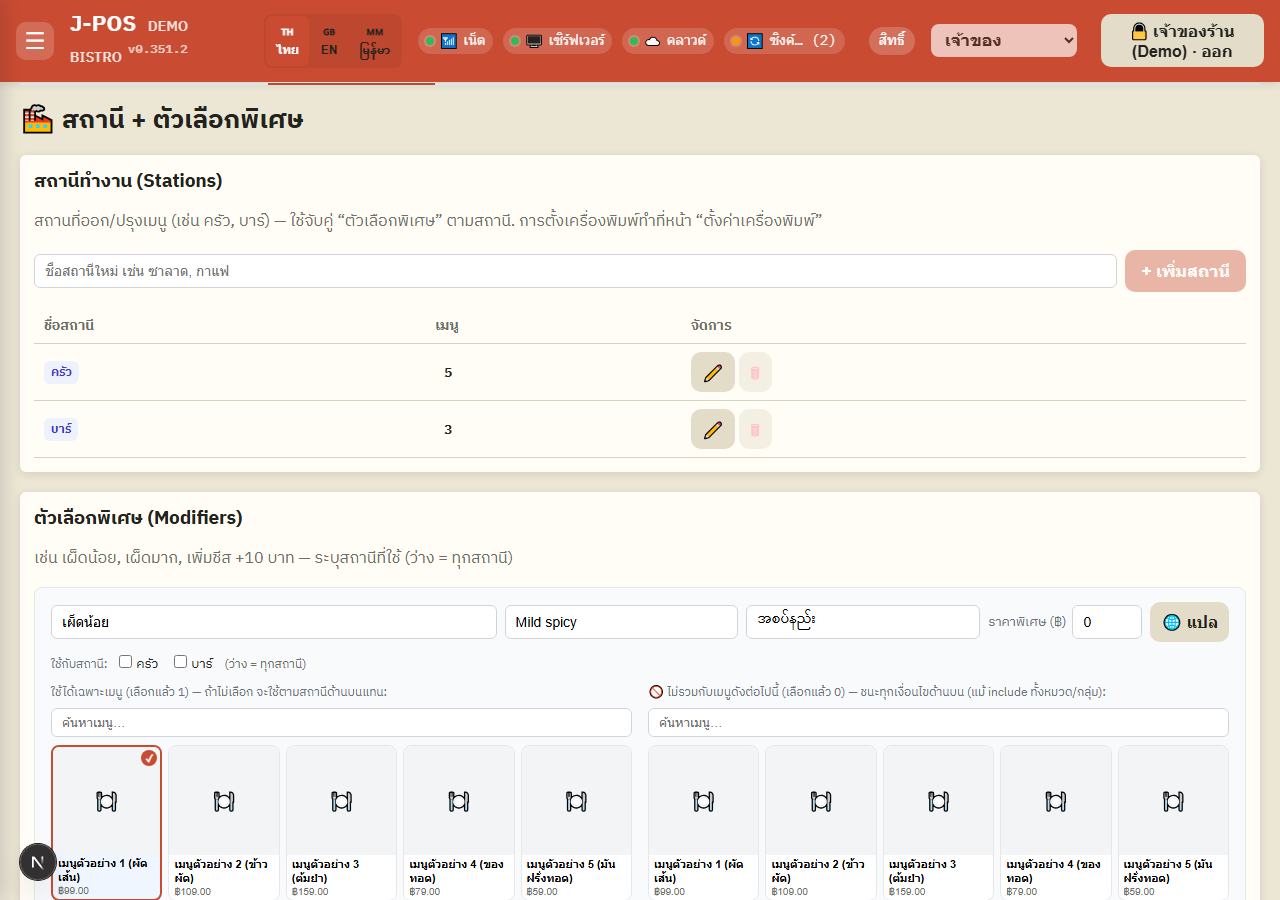
Open full size Edit / delete / bulk-translate modifiers
Press ✏️ on a modifier row to open its edit popup (same fields as adding one); press 🗑 to delete (always asks for confirmation first — deletion can't be undone).
Check several modifiers at once and press "🌐 Translate selected (N)" to translate all of them in one go — the system only fills whichever language is still blank, it never overwrites a name you've already entered.
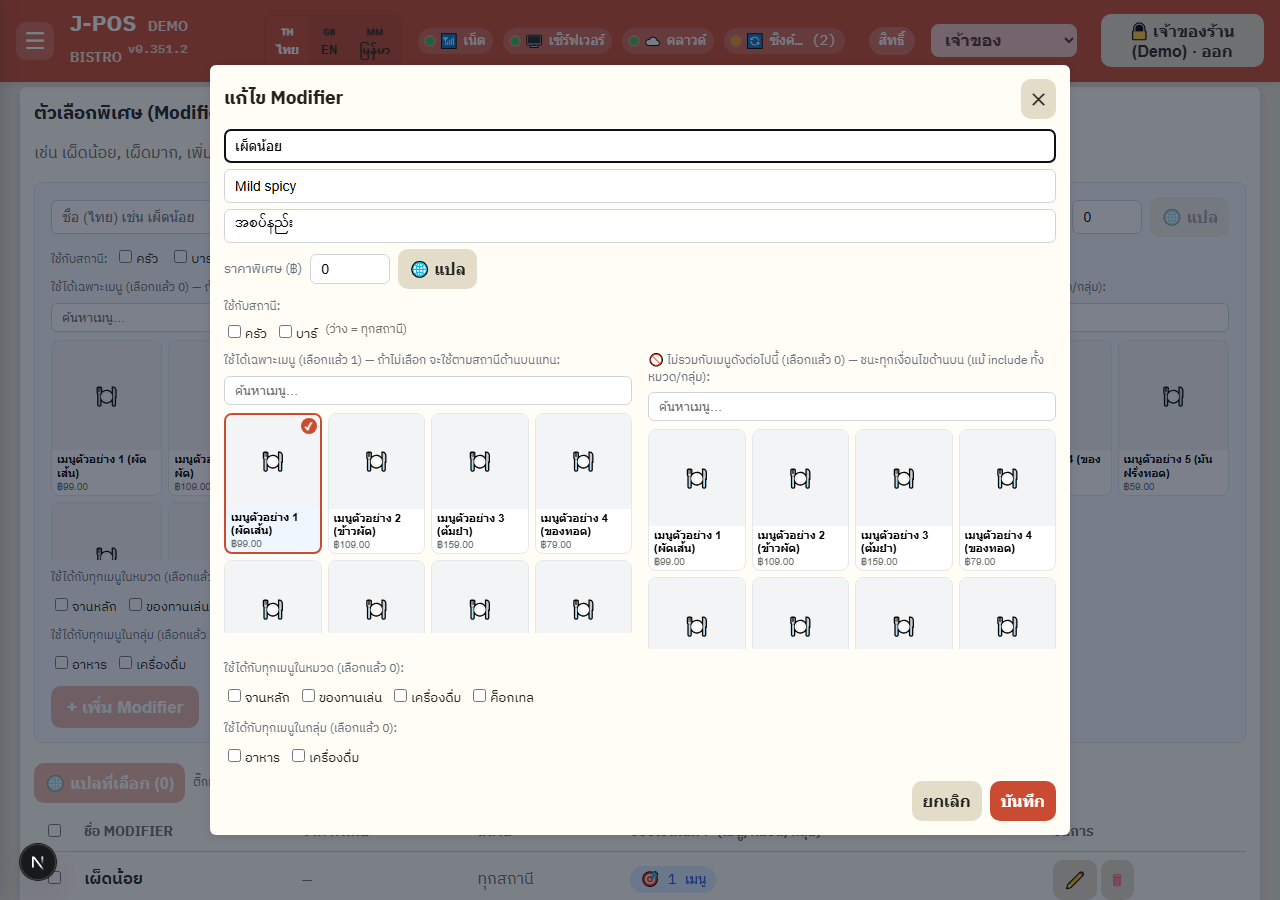
Open full size
🧮 Shop-wide BOM cost (requires cost.view)
Shop-wide cost overview
The card row at the top summarizes: total items, average food cost % shop-wide, count of high-cost items (food cost > 40% of selling price), count of items with no recipe set at all, and count of modifiers whose ingredient cost eats more than 70% of their own surcharge.
Click the "No recipe set" card while edit mode is on to filter the list below to just that worklist of items missing a recipe.
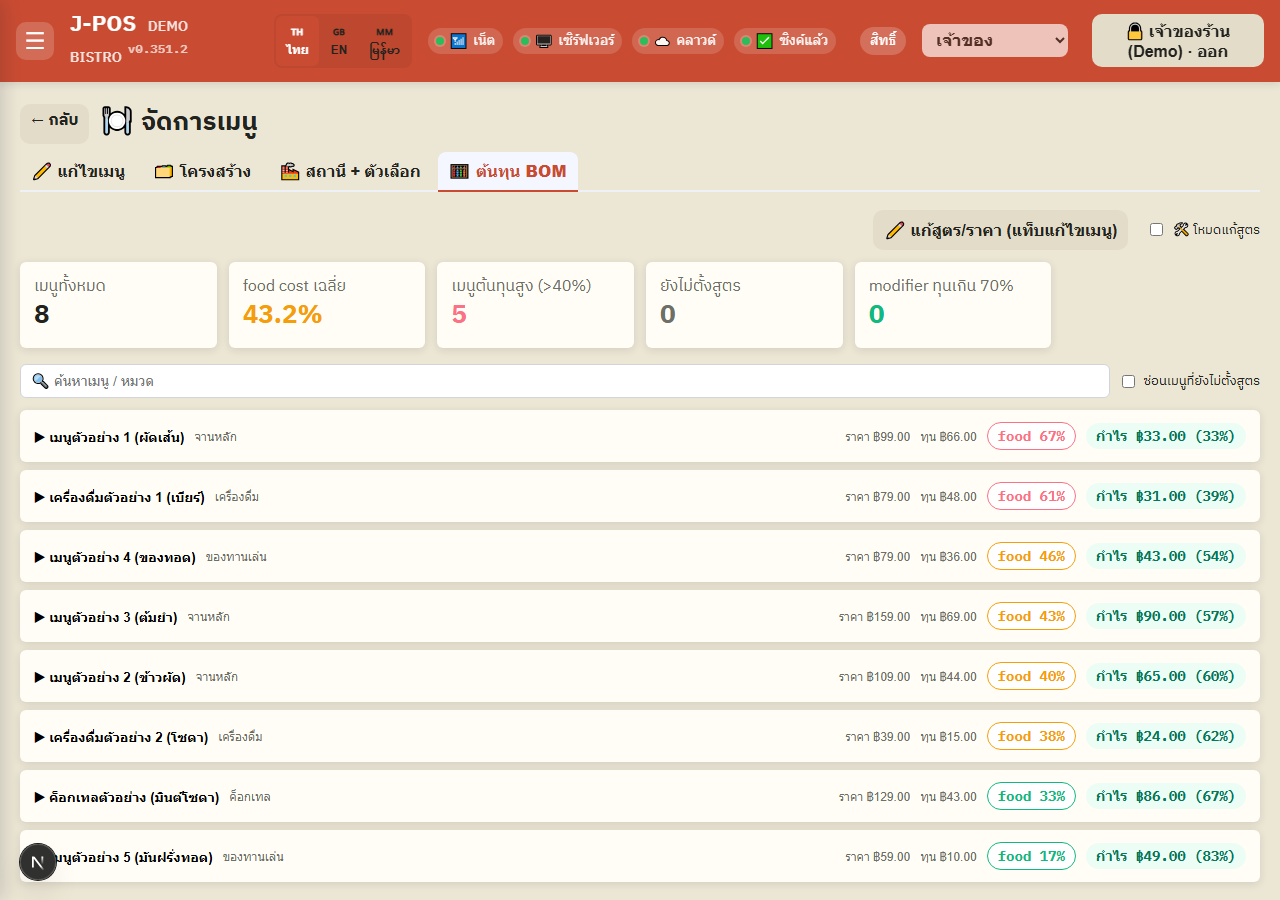
Open full size View an item's cost breakdown
Click an item row to expand a line-by-line ingredient table (quantity, unit, cost/unit, total, % of total food cost) — items with no recipe yet show a "No recipe set" badge instead of numbers.
If the item has applicable modifiers, a separate "worst" % is shown for the case where the customer picks every applicable modifier at once — modifier cost is never automatically summed into the item's base cost, it's always shown as its own separate number.
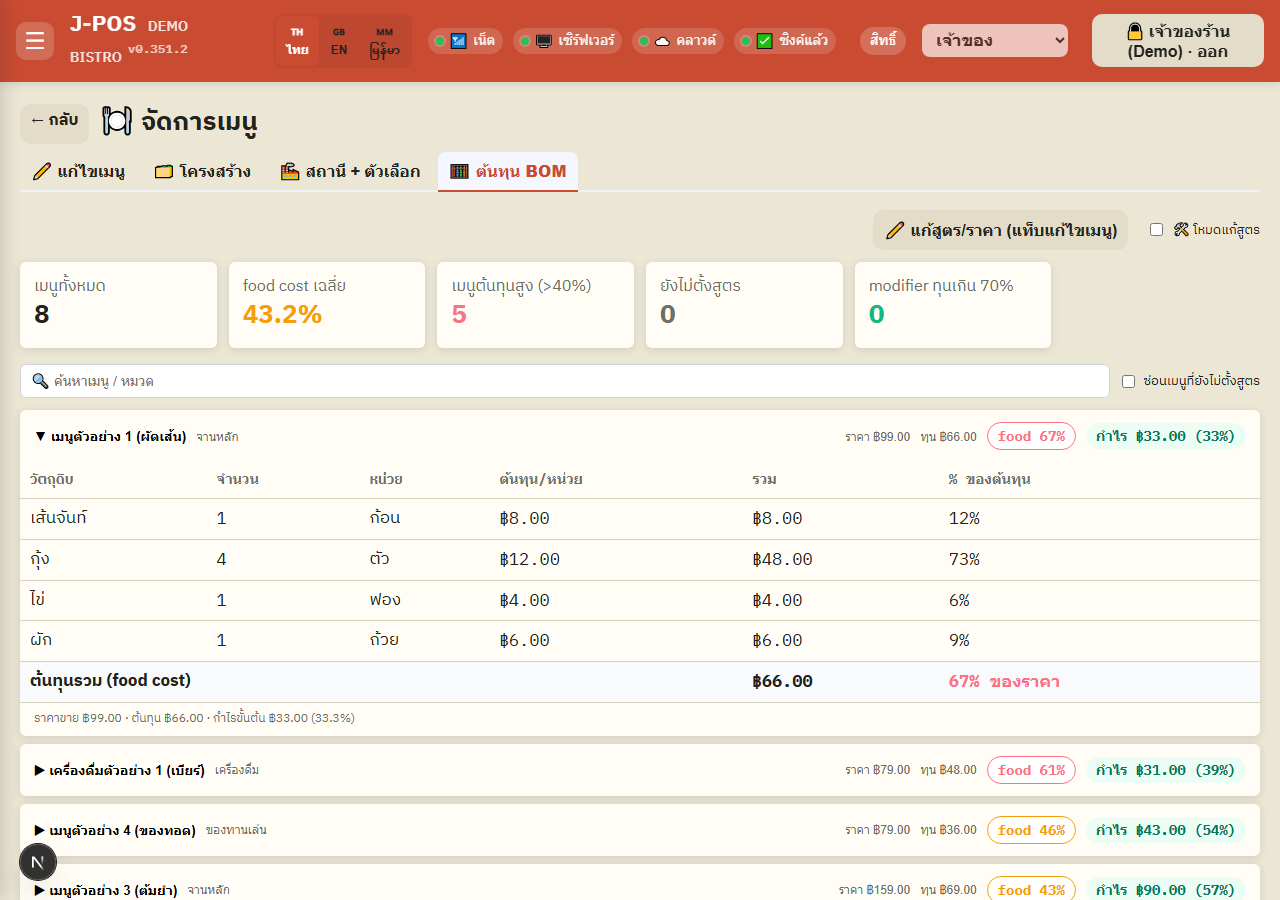
Open full size Edit a recipe right from the BOM cost page (edit mode)
If you also hold menu.edit, a "🛠️ Recipe edit mode" switch appears top-right (off by default) — turn it on to edit an item's recipe or a modifier's own recipe right from this page, without switching to the Edit-menu tab.
In edit mode, a "Copy recipe from another item" dropdown lets you pick an existing item with a recipe already set and copy it over instead of typing everything from scratch (if a recipe already exists, the system asks for confirmation before overwriting it).
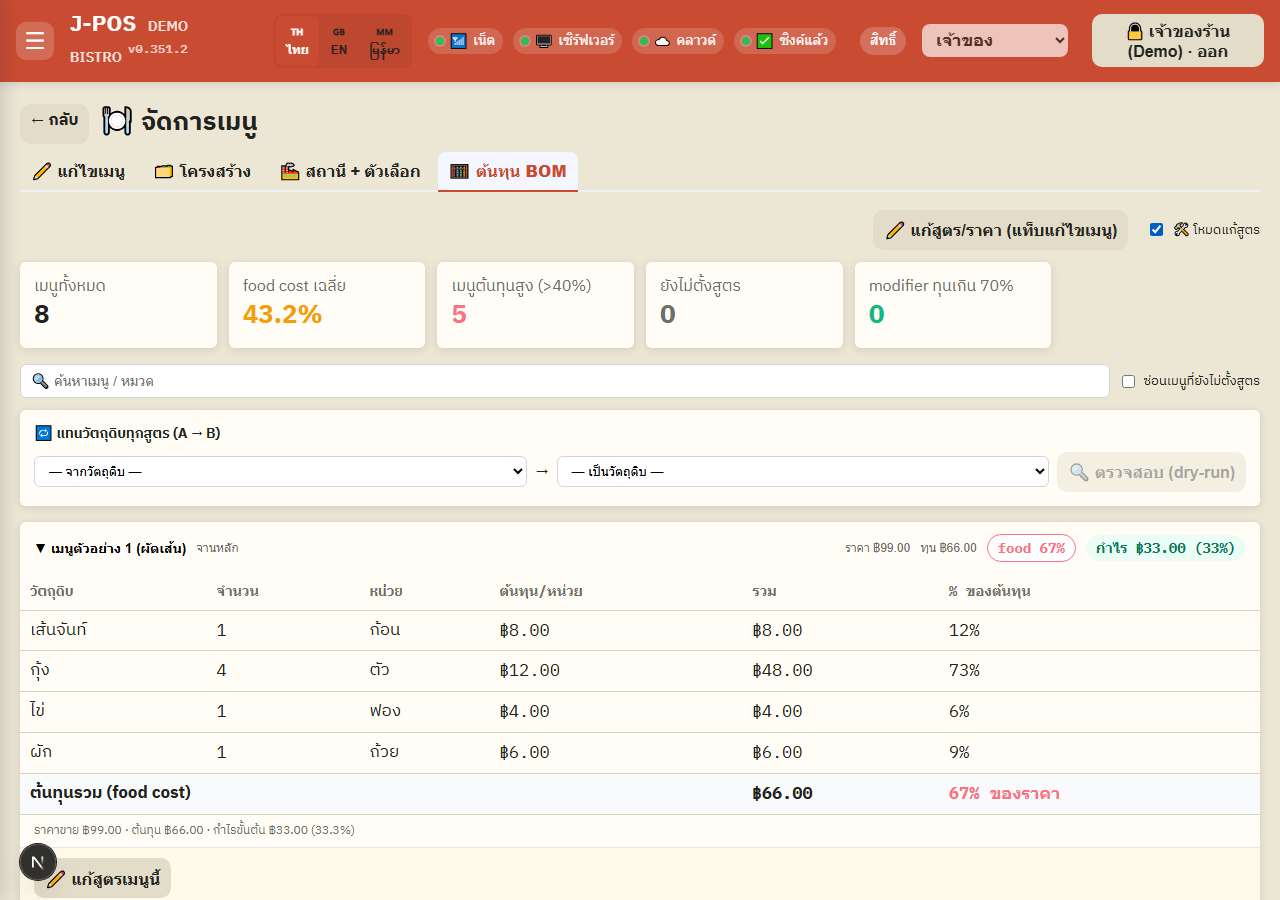
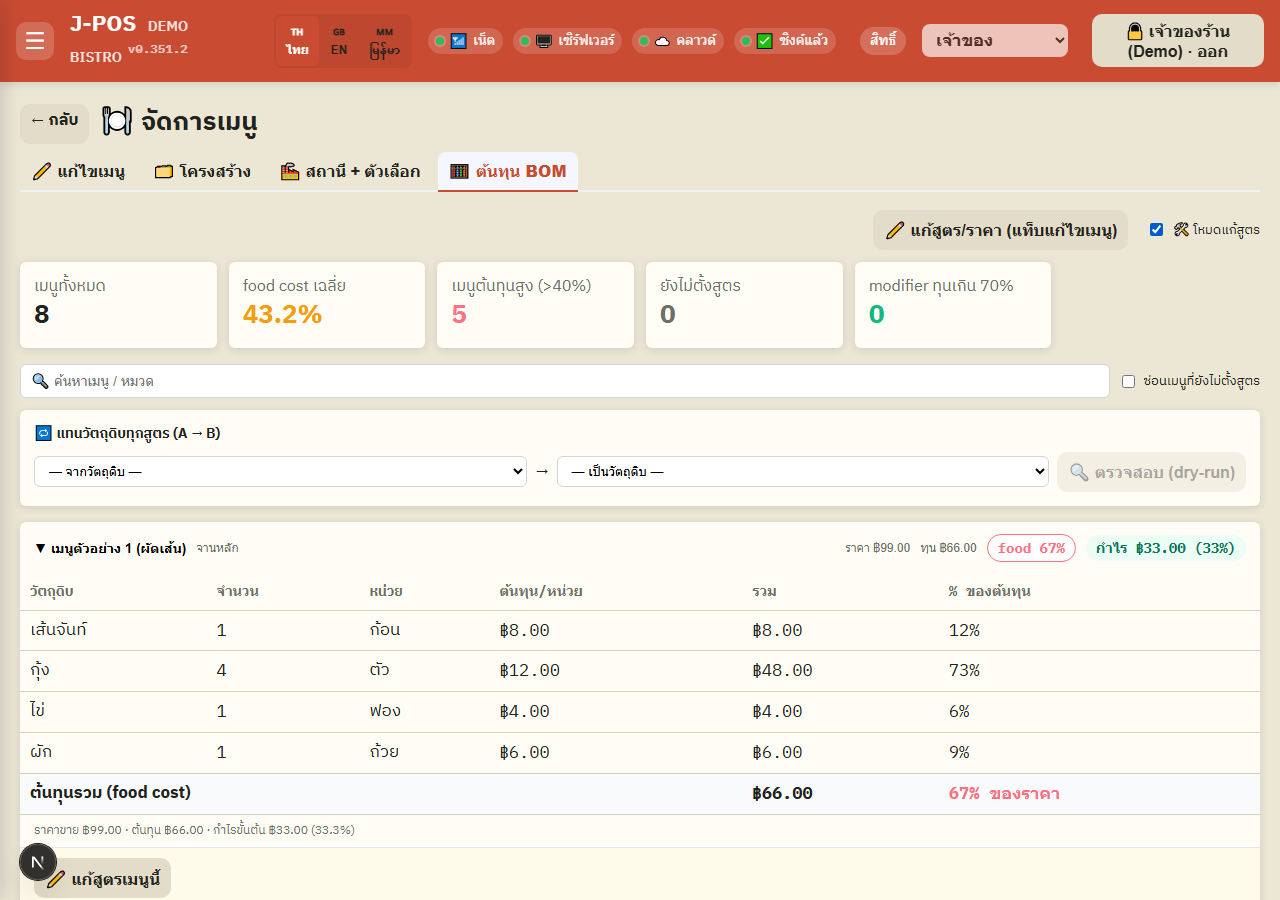
Open full size Replace one ingredient with another across every recipe (A → B)
In edit mode, scroll to the "🔁 Replace an ingredient across all recipes (A → B)" card, pick a source and target ingredient, then always press "🔍 Check (dry-run)" first — the page never lets you replace directly without checking.
The check result splits into "Will be replaced" (unit-compatible) and "Unit mismatch — needs manual fix" (recipes whose deduct unit doesn't exist on the target ingredient); press "✅ Confirm replace" to apply only the safe group — mismatched recipes must be fixed one at a time by hand.
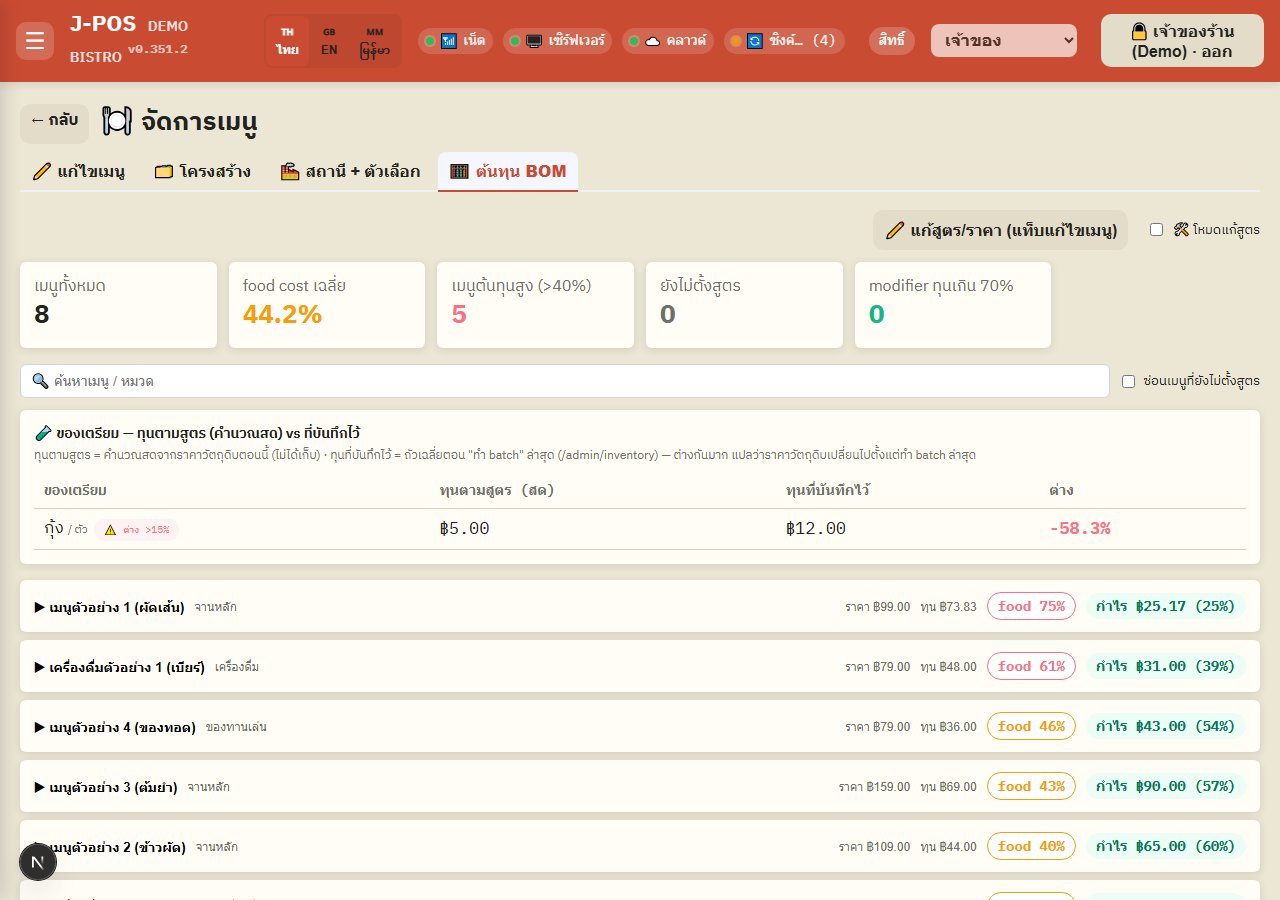
Open full size Prep items — live recipe cost vs. the stored cost
If the shop has any "prep" ingredients (ones with their own sub-recipe, e.g. a house-made sauce), a table compares "live recipe cost (computed right now from current ingredient prices)" against "stored cost (the weighted average from the last time a batch was made, on the Stock page)".
A difference over 15% gets an "⚠️ >15% difference" badge, flagging that it's probably time to make a new batch so the stored cost catches up with current ingredient prices.
Open full size
Common points of confusion
Deleting a group/category is blocked — deleting an item is not
Deleting a "group" that still has categories inside it is blocked server-side ("This group still has categories in it — move or delete them first"), and deleting a "category" that still has items in it is blocked the same way ("This category still has items in it — move or delete them first"). But deleting a single "item" has no such guard beyond the browser's confirm popup — it's permanent, so be especially careful deleting one item, or several at once via bulk delete.
Deleting a station is guarded the opposite way from groups/categories
A station can't be deleted while any item still uses it (the 🗑 button is disabled and shows the count of items using it) — the exact opposite of item deletion above, which always lets you delete regardless of what still references it.
Duplicate menu names are allowed — nothing checks for it
Both the quick-add and detailed-add forms let you create or rename an item to match an existing item's name exactly, with no warning or block. If you want to avoid duplicates, search the name yourself before adding.
A mismatched deduct unit is blocked when adding a recipe row
Picking a unit that's neither the ingredient's held unit nor its configured deduct unit blocks the "➕ Add" button entirely and shows "Unit … doesn't match ingredient …" along with the units that are actually valid — this is what prevents the old silent "wrong-unit ×1" stock-deduction bug from recurring.
One "Save" click is actually two separate requests
The "💾 Save" button on the Edit-menu tab fires two requests in sequence: the first saves the Thai name/price/category/station/sell-time-window etc., the second saves the EN/Burmese names separately. If the second request fails (e.g. the connection drops mid-way), the Thai name and price are already saved but the EN/Burmese names are not — the page shows "Failed to save the other-language name" and you need to press Save again.
Per-item cost needs cost.view
In the editor on the "✏️ Edit menu" tab and the edit panel on the "🗂️ Structure" tab, staff with only menu.edit can still edit the recipe, but every cost figure (per ingredient, per line and the item total) reads ••• and the margin % is not shown; the selling price stays visible. The "🧮 BOM cost" tab (the shop-wide overview + per-ingredient breakdown) is not shown at all without cost.view.
Deep-linking into 🧮 BOM cost without permission silently falls back
Opening /admin/menu?tab=bom on an account without cost.view doesn't show a permission-denied message — it silently falls back to showing the "✏️ Edit menu" tab instead, since that's the one tab guaranteed to be accessible.
Modifier scope: exclude always wins; menu/category/group union beats the station filter
The order a modifier's applicability is decided: (1) if the item is in "🚫 Not combinable with these items" — it's never applicable, this always wins even over an included category/group. (2) if not excluded, and any of "only these items/category/group" is set (union — an OR, not an AND across the three) — that scope entirely replaces the station filter, it doesn't layer on top of it. (3) if none of the three scopes are set at all — falls back to the plain station filter.
Sell-time / sell-date / sell-days combine with AND, not OR
If a sell-time window, a sell-date range, and specific sell-days are all set at once, the item is only orderable when ALL of them hold at the same time (AND), not just one. And selecting no weekday at all doesn't mean disabled — it means orderable every day (the default).
Replacing an ingredient A→B always requires a dry-run first
The BOM cost page never lets you replace an ingredient across every recipe immediately — you must press "🔍 Check (dry-run)" first to see which recipes can be safely replaced (compatible units) and which need a manual fix (unit mismatch); confirming only applies the change to the safe group.